How to Add Page Numbers to a Microsoft Word Document
Creating a document in Microsoft Word for Mac? Depending on who you’re creating the document for, you may have to add page numbers. Many organizations such as schools and legal entities have very strict guidelines regarding the numbering of pages.

Here’s how to add page numbers to a Microsoft Word document on your Mac:

- Open Microsoft Word on your Mac, and then create a new document.
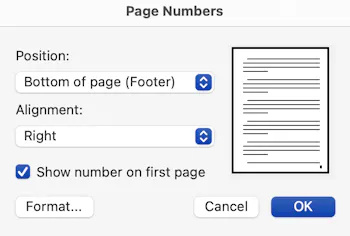
- From the Insert menu, select Page Numbers. The Page Numbers window appears, as shown below.
- From the Position menu, select a location for the page numbers. You can set the page number to be displayed at the top or bottom of the page.
- From the Alignment menu, select a position for the page numbers. You can choose left, center, or right alignment. And if you’re planning on binding your document, you might want to use the inside or outside options, which are specifically designed for bound documents.
- Optional: To hide the page number on the first page of your Word document, deselect the Show number on first page checkbox.
- Click OK to save and apply your changes.
Congratulations! You have successfully added page numbers to your Microsoft Word document.
Changing the Format of the Page Numbers
Some organizations require the page numbers to be displayed in a certain format. For example, instead of the usual format (1, 2, 3…), you might need to use roman numerals (I, II, III…) or even letters (a, b, c…). Here’s how to change the format of the page numbers in your Microsoft Word document:

- Open your Microsoft Word document, if it is not already open.
- From the Insert menu, select Page Numbers. The Page Numbers window appears.
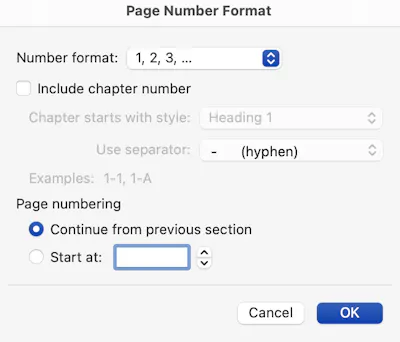
- Click Format. The Page Number Format window appears, as shown below.
- From the Number Format menu, select a page number formatting option.
- Click OK.
- Now you’re back in the Page Numbers window. Click OK to save and apply your changes.
Now the page numbers in your Microsoft Word document are formatted the way you want them to be!
Adding “Page 1 of X” to the Footer
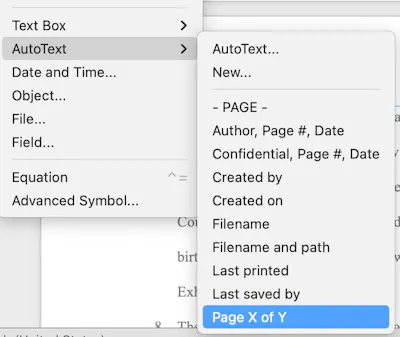
Microsoft Word for Mac includes a quick and easy way to insert “Page 1 of X” in the footer, where “X” is the total number of pages. To do this, select Autotext from the Insert menu, and then select Page X of Y, as shown below.

The “Page 1 of X” text will be inserted into the footer of your document.
Related Articles
- How to Change the Margins in a Microsoft Word Document
- How to Show the Word Count in Microsoft Word for Mac
- How to Double Space Microsoft Word for Mac Documents
- How to Add Page Numbers to an Apple Pages Document
Subscribe to our email newsletter
Sign up and get Macinstruct's tutorials delivered to your inbox. No spam, promise!

![]()


